 I adore Nordic Christmas decor so this year I decided to add a touch of it to my home by making these Nordic-inspired Christmas decorations to hang on the tree!
They're very simple to make and the only skill involved is knowing the blanket stitch which is also very easy to grasp.
If you're new to it, check out some tutorials on youtube to get the basics.  I've always been guilty of celebrating Christmas a little earlier than others but now that the tree is up, I am feeling super festive!
DIY Nordic Inspired Christmas Decorations
- Red and white felt
- Red and white embroidery thread
- Some festive gingham ribbon cut into approximately 10cm lengths
- An embroidery needle
- Scissors
- A star or heart template (I just printed one out from online and traced)
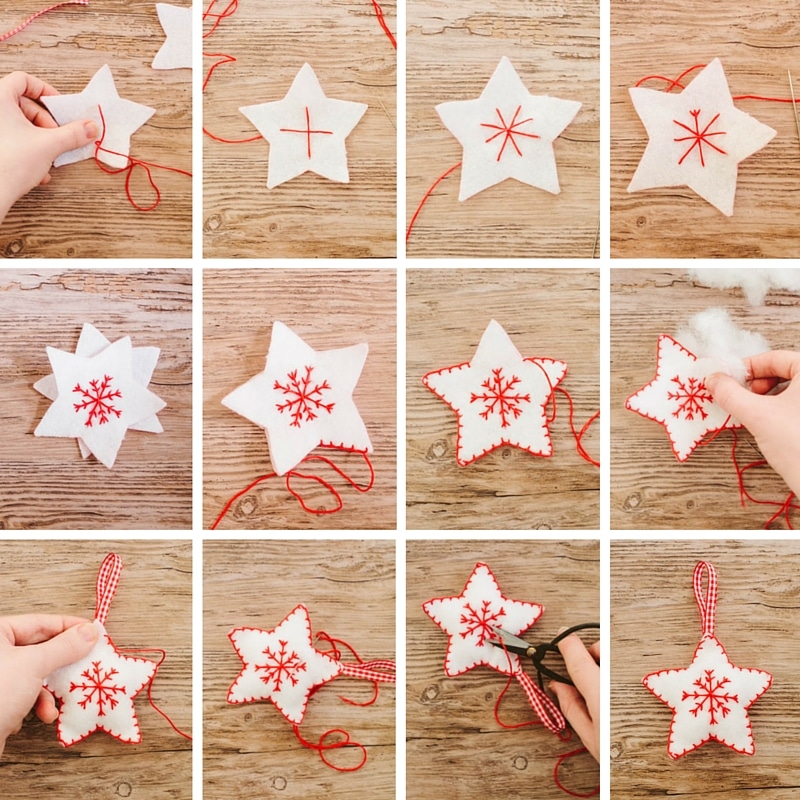
- Using red or white felt, cut out 2 x your chosen shape (I used a star and a heart template).
- Using a contrasting red or white embroidery thread, stitch a large cross in the centre of the shape.
- Then add two more stitches to create a star shape. Start adding small 'V' shapes along the lines to create a snowflake pattern.
- Use a blanket stitch to stitch the two sides together all around, leaving just enough space to add the stuffing and some ribbon to hang the decorations with.
- Once you've added the stuffing, fold a piece of ribbon in half to create a loop and secure it in place whilst you stitch around it.
- To finish the blanket stitch, loop the thread through the last stitch to secure, then insert the needle through the outer stitching and out through the centre of the decoration. Pull the thread through and cut so it disappears back into the centre of the deocration.
- And you're done! Hang on the tree or give these decorations as gifts!





Nancy says
Thank you. I make different ornaments each year for my grands. I date them and add our names.
Mara says
I just used your page as inspiration to put a Nordic design on some felt, bell ornament. Thank you for sharing.
Jessica Edmunds says
Gorgeous decorations, we haven't bought any as my flat is so small but this is such a lovely idea to do xxx
Anca says
They look so pretty, you are very talented. x